.png?width=202&height=50&name=Logo%20(1).png)
1. Building or Cloning a Comp Cycle

Some teams start from an existing cycle and clone it. If you're new to Pequity, you can totally create one from scratch!
Clone an existing cycle
Cloning is ideal for:
-
Year-over-year cycles
-
Creating a separate “modeling” or “pre-planning” cycle for executives before manager planning
What cloning does:
-
Copies columns, formulas, layouts, and logic exactly
-
Does not automatically update people data until you explicitly re-sync (by design)
After cloning:
-
Re-sync people data so the cycle reflects current employees.
-
Update any formulas or logic based on the new year’s rules.
-
Confirm that any hidden admin columns are still correct.
Archive vs delete

From the cycle list:
-
Archive
-
Hides the cycle from non-admin users.
-
Moves it into an “Archived cycles” folder only admins can access.
-
Allows admins to view formulas and final data, but not edit while archived.
-
You can unarchive if you need to re-open or adjust.
-
-
Delete
-
Permanently removes the cycle. Use sparingly.
-
2. Planning Hierarchy: Waves and Planning Groups
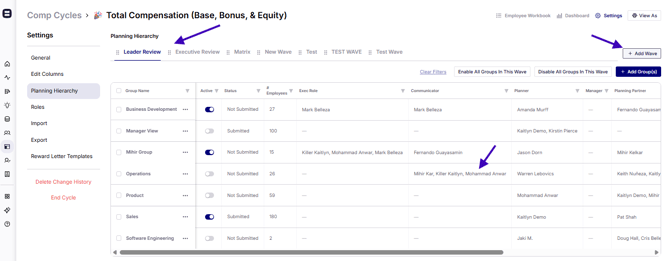
The planning hierarchy is the heart of how people access and approve compensation in Pequity. Check out our deep dive guide for the planning hierarchy!
Key concepts
-
Wave
A “step” or “phase” in the process (e.g., Executive Pre-Planning, Manager Planning, etc.). -
Planning Group
Inside each wave are planning groups — “folders” of employees that a specific planner or planning partner owns for that step (e.g., “VP Engineering,” “Director Sales East”).
Core rule:
Each employee can only belong to one planning group per wave.
This is how Pequity understands who can plan for whom in each phase.
Common use case: Executive pre-planning then manager planning
A typical structure is:
-
Wave 1 – Executive Pre-Planning
-
Planning groups by executive or ELT member
-
Executives validate or adjust initial recommendations and overall spend
-
-
Wave 2 – Manager Planning
-
Planning groups by people managers
-
Managers finalize recommendations within the approved budgets
-
You can add more waves if you need additional review/approval steps.
Multiple users and collaboration
-
Multiple users can be in the same cycle and planning group at the same time.
-
Admins and planning partners can help input or adjust data alongside planners.
-
Be careful with multiple waves active at once — users can overwrite each other’s changes.
-
Many teams prefer turning on one or two waves at a time (e.g., execs first, then managers).
-
3. Planner vs Admin Experience
Admins have the “full control” view; planners/partners see a streamlined version.
Admin capabilities
Admins can:
-
Edit columns and formulas at any time (even during a live cycle — use caution).
-
Change column order and visibility.
-
Bulk edit fields.
-
Configure waves and planning groups.
-
Manage roles and permissions.
-
Access and clear change history.
-
Control budgets and whether they appear to planners.
Planner & planning partner capabilities
Planners/planning partners:
-
See only the columns and employees they’re allowed to view.
-
Can often:
-
Filter and sort columns.
-
Show/hide some columns (except critical input fields).
-
Enter recommendations (e.g., merit %, bonus, equity).
-
-
May or may not be allowed to:
-
Bulk edit
-
Export data
-
View budgets
-
See change history
…depending on how you configure roles.
-
4. Columns, Tooltips, and Color Coding

A clear layout dramatically improves manager adoption.
Columns & tooltips
As an admin, you can:
-
Add or remove columns (e.g., department, eligibility, compa-ratio).
-
Mark columns as:
-
Filterable/sortable
-
Editable or read-only
-
Visible to admins only, or visible to all planners
-
-
Add tooltips on columns (the little “i” icon):
-
Use them to explain:
-
How a field is calculated
-
What a range means
-
When to override recommendations
-
Any key philosophy notes
-
-
Planners see these tooltips by hovering over the icon at the top of the column.
Color-coding
You can color-code columns, and many teams:
-
Choose a consistent color for input fields (e.g., all planner-entered recommendations are one color).
-
Use distinct colors for:
-
Read-only data
-
Calculated outputs
-
Flags/alerts
-
Call this out during training:
“Anything in [input color] is what you, as a manager, can change.”
5. Roles & Permissions
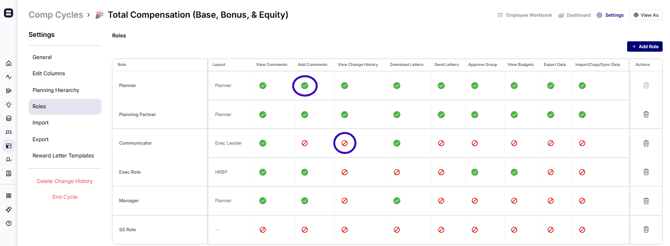
Roles control what each user can see and do in a cycle. You can:
-
Use predefined roles (admin, planner, planning partner) or create custom ones.
-
Toggle abilities per role, such as:
-
View budgets
-
View change history
-
Export data
-
Import/overwrite data
-
Submit a planning group
-
Best practices:
-
Keep import rights restricted to HR/comp admins.
-
Allow planners to export only if you’re comfortable with them using CSVs offline.
-
Consider hiding budgets from some roles if you want them to focus on recommendations rather than constraints.
6. Budgets & Overspend Rules
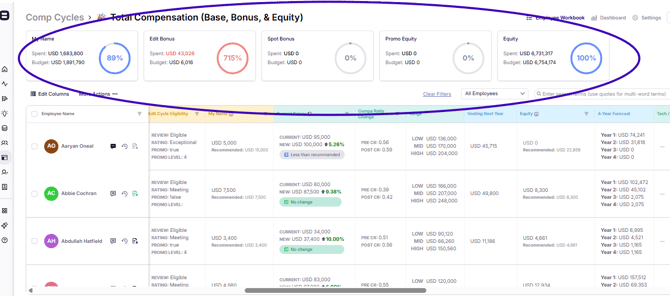
Pequity supports both “bottom-up” and “top-down” budget strategies.
Option 1: Logic-based (bottom-up)
-
Budget is handled via formulas that:
-
Apply recommendations to each employee
-
Sum them up by group and compare to a target
-
-
You can display budgets in the summary cards at the top of the planner view.
Option 2: Top-down per planning group
-
Set a maximum budget at the planning group level in the planning hierarchy.
-
Planners see their available budget and can allocate it across their employees.
-
The system allows overspend but:
-
Flags overspend
-
Can require a justification comment when someone goes over the recommended or allowed amount.
-
You can toggle budget cards on or off per role.
7. Assigning Planning Groups (ELT → Managers Example)
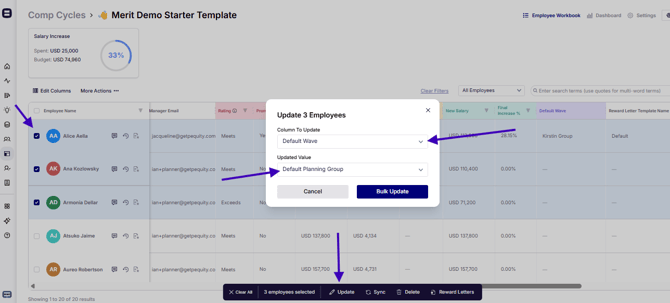
Assigning groups can be done:
-
Directly in the grid
-
Filter employees (e.g., by department, ELT, or manager).
-
Use bulk update to set the planning group for that wave.
-
-
Using a spreadsheet + bulk update
-
Prepare a list of employee IDs (EIDs) and the desired planning group.
-
Paste EIDs into the bulk update tool.
-
Select the relevant wave column and assign the group.
-
Common pattern:
-
Filter by ELT leader and assign those employees to the ELT’s planning group in the pre-planning wave.
-
Later, filter by people manager and assign employees to the manager’s group in the manager wave.
8. Change History
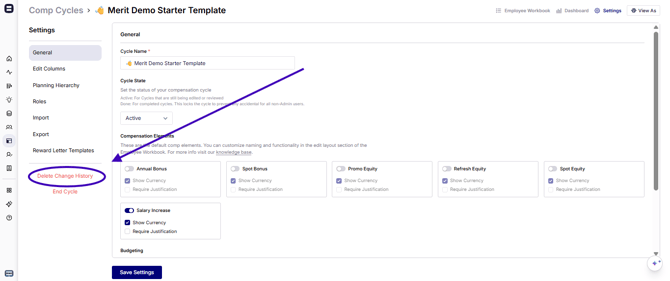
Change history helps you audit who changed what and when.
-
While you’re modeling and building the cycle, lots of test changes accumulate.
-
Right before go-live, you can:
-
Export the change history if you want a record of modeling activity.
-
Clear the change history so that new entries start from a clean slate once managers begin planning.
-
You can also toggle whether planners can see change history at all.
9. Performance Ratings & Data Refresh
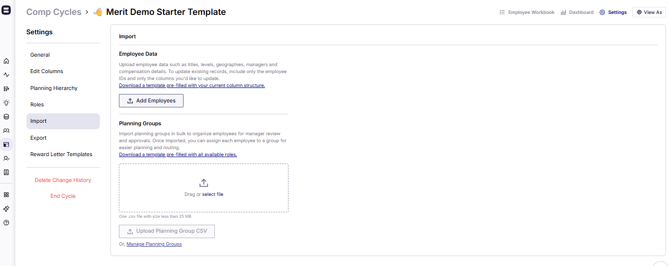
If performance ratings or other inputs change late in the process, you can refresh them with a simple import.
Typical pattern:
-
Draft performance ratings are prepared by a certain date.
-
Final ratings are locked a bit later.
-
Pequity can be updated by importing a file that contains:
-
Employee ID (EID)
-
Performance rating (and/or other updated fields)
-
As long as EIDs match, you can import just those fields; Pequity updates the corresponding columns automatically. You don’t need to re-import the full dataset.
10. Reward Letters & Total Rewards Statements
Pequity’s reward letters feature lets you generate personalized letters or total rewards statements directly from the cycle.
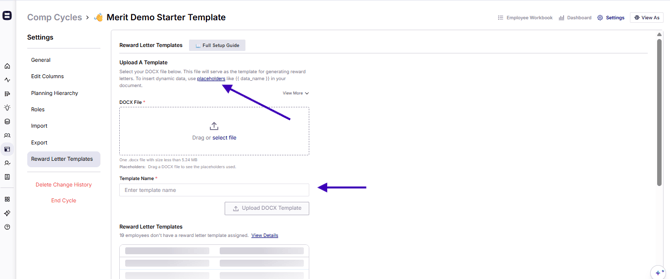
Building the template
-
Create a DOCX template in your own brand (logo, fonts, colors, layout).
-
Use Pequity’s placeholders to drop in data (e.g., new salary, merit %, bonus, equity value, benefits totals).
-
Upload the template into the reward letters section of your comp cycle.
You can:
-
Reuse the same template in future cycles.
-
Update it by uploading a new DOCX under the same template name to overwrite.
Generating & delivering letters
From Pequity, you can:
-
Generate letters in bulk for all assigned employees.
-
Download letters in bulk as a ZIP file.
-
Allow certain roles to:
-
Download individual letters (e.g., for manager-led delivery conversations).
-
Email letters directly to employees as PDF attachments.
-
Notifications to employees are not automatic; that’s intentional so you can control when and how letters are shared.
Signatures & e-sign
Current limitation:
-
Employees cannot sign directly in the Pequity-generated letter.
-
Workaround:
-
Use Pequity to generate PDFs.
-
Load them into your e-signature platform (e.g., DocuSign, HelloSign).
-
If needed, include pre-signed executive signatures as images in the template.
-
You can maintain separate templates if different leaders need different signatures.
11. Single Sign-On (SSO)
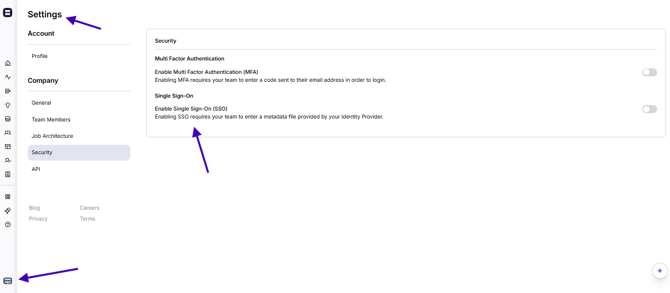
Pequity supports SSO, including Okta.
To enable SSO:
-
Export your SAML/metadata XML file from your identity provider (e.g., Okta).
-
Upload it into Pequity’s SSO settings.
-
Ensure:
-
The email in Pequity’s team member settings matches the SSO/Okta email exactly.
-
The Pequity tile/app is assigned to the right user group on your IdP side.
-
If emails don’t match, users may log in and see an “empty” account — support can help fix this by aligning the records.
Many customers start with SSO for managers involved in the comp cycle only, then later expand.
12. Quick Checklist for Your Next Comp Cycle
Use this as a high-level runbook:
-
Decide timelines
-
When are draft vs final performance ratings ready?
-
When do executives model vs managers plan?
-
-
Clone last year’s cycle
-
Re-sync people data.
-
Update formulas, columns, and tooltips.
-
-
Set up planning hierarchy
-
Define waves (e.g., Exec Pre-Planning, Manager Planning).
-
Create planning groups and assign planners/partners.
-
Set budgets per group (if using top-down).
-
-
Configure roles & views
-
Decide what each role can see:
-
Budgets?
-
Change history?
-
Export/import?
-
-
Color-code input fields and key outputs.
-
Add tooltips where needed.
-
-
Import performance ratings and other data
-
Bring in draft ratings.
-
Plan for a final ratings refresh if dates change.
-
-
Clear change history before go-live
-
Export modeling history (optional).
-
Clear to start fresh for manager changes.
-
-
Train planners
-
Walk through waves, budgets, input fields, and justification rules.
-
Emphasize color-coding and tooltips.
-
-
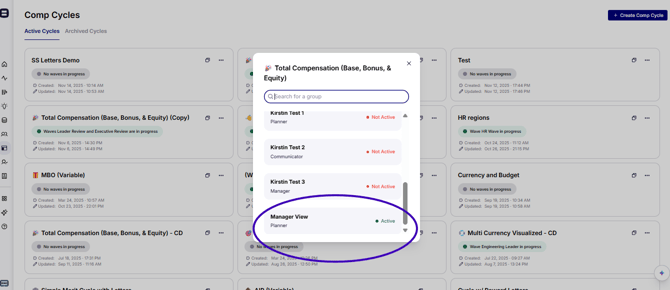
Run the cycle
-
Activate waves.
-
Monitor statuses (active vs submitted).
-
Reactivate specific groups if they need to “fix and resubmit.”
-
-
Generate reward letters
-
Finalize templates and placeholders.
-
Generate and distribute letters via managers or bulk email/download.
-
Export PDFs for any e-sign workflows.
-
-
Archive the cycle
-
Archive once everything is complete.
-
Keep for historical reference and future cloning.
-